
THIS HELP GUIDE IS OUTDATED!
>> Please visit our up to date help guide here:
http://support.saleswingsapp.com
----------
In your marketing process, you may want to:
- Send an email to leads when they turn HOT
- Send a nurturing email to leads when they haven't visited in a long time
- Stop an email nurturing drip when leads turn sales-ready
- Other funky stuff...
You can trigger such marketing actions with many email marketing tools which are able to send automated emails based on Salesforce.com custom fields. Examples are AutopilotHQ, Mailchimp and more.
Here's an example guide on how to do this with Mailchimp.
How to send emails with Mailchimp based on Lead Score in Salesforce
(1) Firstly make sure you have installed the 'SalesWings Predictive Lead Scoring and Lead Website Activity Tracking Add-on' Application from the Salesforce AppExchange using the instructions found in the article below:
> Salesforce CRM Integration - SalesWings
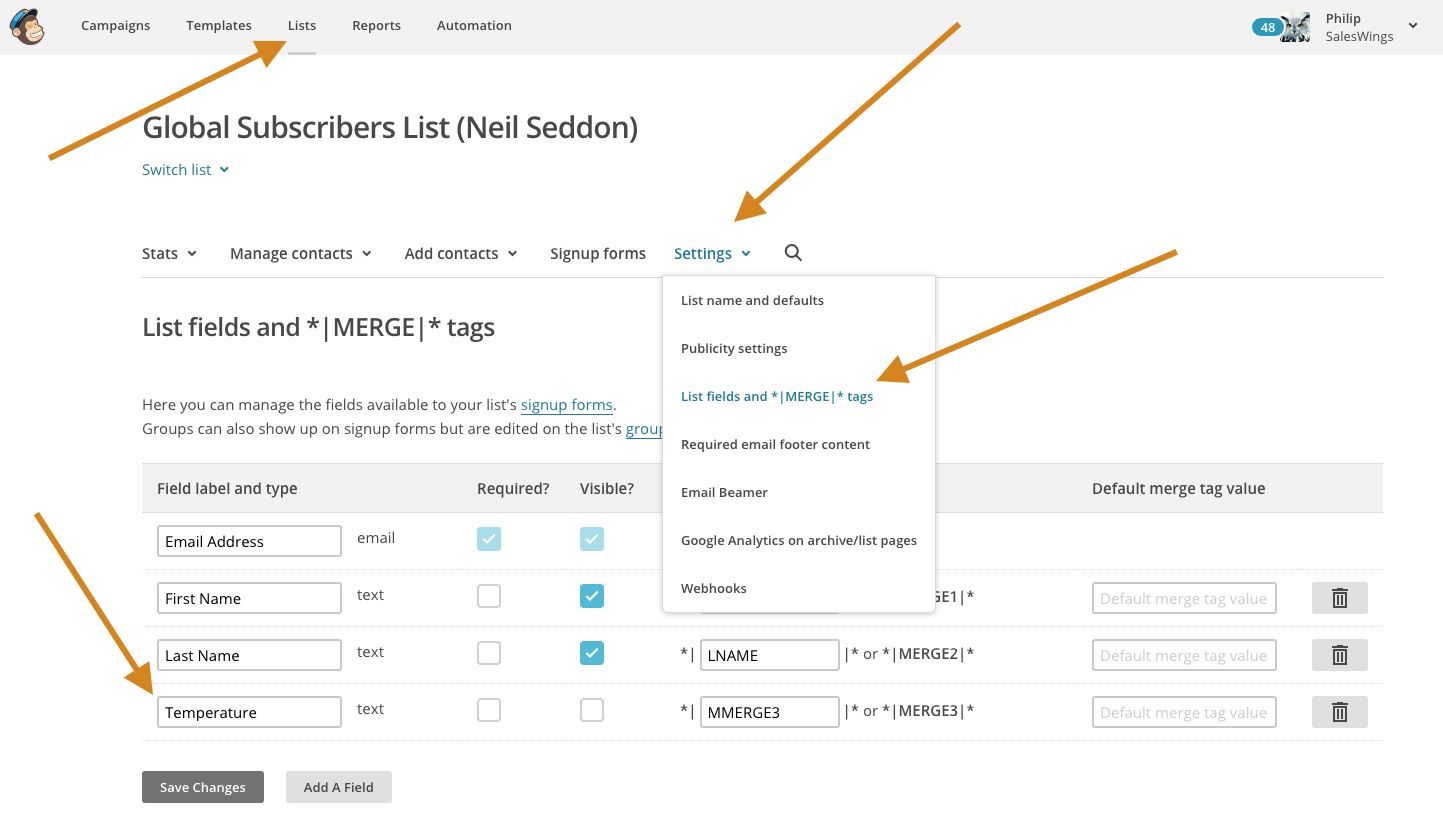
(2) Go to your Mailchimp account, and add a field called "Temperature" to your main contact list.
(3) The next step is to install the MailChimp Application from the Salesforce AppExchange using the following instructions.
> MailChimp for Salesforce Installation Guide
In the 'Turn on hourly sync' section of the guide ensure that your global subscribers list has the 'Temperature' field (field type is 'Text') mapped correctly (see screenshot below).
(3) Now that hourly syncing is switched on and the initial batch sync between Salesforce and MailChimp has completed the next step is to setup an Automation Workflow in MailChimp to send your 'Hot' leads/contacts a pre-built email template of your choice.
- Navigate to the Automation page and click the Create Automation Workflow button.
- Next choose your global subscribers list as the list that will receive the workflow emails.
- Select the 'Custom Event 'workflow type.
- In the Setup step, fill out the Workflow configuration fields and choose your tracking options. These settings will be applied to all the emails in your workflow. You'll configure each email's settings later.
- Click the "Send activity digest email" check box to receive a daily email with reporting data for your workflow
- Select Edit to choose which account users you want the digest email to send to.
When you reach the Emails step, click on the Design Email button (see screenshot below) to build the email template that will be sent to your hot leads/contacts. Once you have finalized your email's design click on the 'Save and Return to Workflow' button in the top right corner of the screen.
Next click on the 'Edit trigger' link (see screenshot below).
(4) Next click on the 'Change trigger' link then select the 'List management' tab and click on the 'Changed list field to value' option (see screenshot below).
(5) Next change the Delay dropdown to 'immediately' the list field to 'Temperature' and the value to 'HOT' (as shown below).
(6) Click the 'Update Trigger' button in the top right of the screen.
(7) Click the 'Next' button in the bottom left hand corner of the screen.
In the Confirm step, look over the Pre-delivery Checklist and test your emails if you haven't already. Click Resolve or Edit to make changes.
Need help with the setup, or have questions?
We will be happy to help you with the setup. Simply contact us atsupport@saleswingsapp.com!
Have a nice day!
Your SalesWings Team
0 Comments